

Losing an important file can be stressful, especially if you emptied the Trash, replaced a document by mistake, or only realized days later that something was missing. If you’ve been backing up your Mac with Time Machine, there’s a good chance you can recover the file without using third-party recovery software.
Time Machine is Apple’s built-in backup system for macOS. It automatically saves snapshots of your files, apps, system settings, and documents at regular intervals.
That means you can restore a single file, an older version of a document, or even your entire Mac after a hardware failure. Knowing how to use Time Machine to restore lost files can save hours of work and prevent permanent data loss.
This guide explains how Time Machine restores files, when it works, what its limitations are, and the different ways to recover your data on modern versions of macOS.
What Is Time Machine?
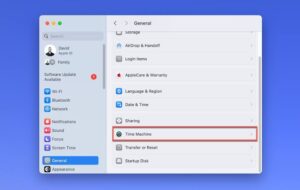
Time Machine is the backup utility included with macOS. After you connect an external drive or choose a network backup location, Time Machine creates automatic backups without requiring much user input.
Instead of copying everything every hour, Time Machine stores only the changes made since the previous backup. This approach saves storage space while allowing you to browse older versions of files.
Depending on your available backup space, Time Machine typically stores:
- Hourly backups for the past 24 hours
- Daily backups for the past month
- Weekly backups for older data until the backup disk becomes full
When the backup drive fills up, Time Machine automatically removes the oldest backups to make room for new ones.
Before You Try to Restore Lost Files
Before opening Time Machine, take a few minutes to confirm a few things.
Make sure your backup drive is available
If you use an external backup disk, connect it to your Mac and wait for it to mount. If your backups are stored on a network drive or Time Capsule, ensure your Mac is connected to the same network.
Verify that Time Machine was backing up your Mac
If backups stopped several weeks ago, files created afterward won’t exist in the backup history.
To check:
- Open System Settings (or System Preferences on older macOS versions).
- Select General > Time Machine.
- Look at the date and time of the latest successful backup.
Know roughly when the file existed
Having an approximate date makes finding the correct backup much easier. Even knowing whether the file existed yesterday, last week, or last month can significantly reduce the time spent searching.
Situations Where Time Machine Can Restore Files
Time Machine works well in many common situations, including:
- You accidentally deleted a file.
- You emptied the Trash.
- You overwrote a document with unwanted changes.
- A folder disappeared.
- You want an earlier version of a spreadsheet or presentation.
- You need to restore an entire project folder.
However, Time Machine can only restore files that were included in a successful backup. If a file was created and deleted before any backup occurred, Time Machine cannot recover it.
How to Restore Lost Files Using Time Machine
The most common recovery method is restoring files directly through Finder.
Step 1: Connect your Time Machine backup
Connect your backup drive if it isn’t already attached.
Wait until macOS recognizes the drive.
Step 2: Open the folder where the file originally existed
Launch Finder and navigate to the location where the missing file was stored.
For example:
- Documents
- Desktop
- Downloads
- Pictures
- A project folder
Opening the original location helps Time Machine display previous versions of that folder.
Step 3: Open Time Machine
Depending on your version of macOS:
- Click the Time Machine icon in the menu bar and choose Browse Time Machine Backups.
- Or open Launchpad or Spotlight and search for Time Machine.
Your current Finder window will transform into the Time Machine interface.
Understanding the Time Machine Interface
The Time Machine interface looks different from normal Finder windows.
You’ll see:
- A timeline on the right side showing available backup dates
- Navigation arrows for moving through backup versions
- The contents of the selected folder for each backup
Move backward through time until you locate the version containing the missing file.
If you aren’t sure when it disappeared, check several nearby backup dates.
Restoring a File
Once you’ve located the file:
- Click the file once.
- Select Restore.
- Wait while macOS copies the file back to its original location.
If the original folder still exists, the restored file usually appears there immediately.
If a file with the same name already exists, macOS may ask whether you want to:
- Replace it
- Keep both versions
- Cancel the restore
Choose the option that best matches your situation.
Restoring an Older Version of a File
Sometimes the file isn’t missing. Instead, you accidentally saved unwanted edits.
Time Machine also stores previous versions.
The process is almost identical:
- Open the folder containing the document.
- Launch Time Machine.
- Browse older backups.
- Select the earlier version.
- Click Restore.
This replaces or duplicates the document depending on your choice when prompted.
This feature is especially useful for:
- Word documents
- Excel spreadsheets
- PDFs
- Photos
- Programming projects
- Design files
Restoring an Entire Folder
If an entire folder was deleted, Time Machine can restore it in one operation.
Instead of selecting individual files:
- Navigate to the parent folder.
- Enter Time Machine.
- Locate the missing folder.
- Select it.
- Click Restore.
Every file stored inside that folder at the time of the backup will be restored.
For large folders, the process may take several minutes.
Restoring Files to a Different Location
Sometimes you don’t want to overwrite current files.
One option is to restore the original file and immediately move it elsewhere.
Another method is:
- Restore the file.
- Copy it to another folder.
- Rename it if necessary.
This lets you compare older and newer versions before deciding which to keep.
Using Spotlight to Help Locate Restored Files
If you’re unsure where a restored file ended up:
- Open Spotlight.
- Search using the filename.
- Check the file’s location.
Finder’s search can also help if you remember only part of the filename.
What Happens if the Original Folder No Longer Exists?
Time Machine normally recreates missing folders during restoration.
For example, if you deleted an entire “Work Projects” folder months ago, restoring a file inside it will often recreate the necessary folder structure automatically.
If Finder cannot restore to the original location, you may receive an error asking you to choose another destination.
Restoring Files on Newer Versions of macOS
Apple has updated Time Machine several times, but the overall restoration process remains similar.
Recent versions, including:
- macOS Ventura
- macOS Sonoma
- macOS Sequoia
still allow you to browse backup history from Finder before restoring files.
The interface may look slightly different from screenshots created on older releases such as Catalina or Big Sur, but the recovery steps are largely unchanged.
When Time Machine Cannot Restore Lost Files
Although Time Machine is reliable, it isn’t designed for every recovery scenario.
You may not be able to recover files if:
- Time Machine backups were never enabled.
- The backup drive failed.
- The file was created after the most recent backup.
- The backup became corrupted.
- The backup disk was erased.
- The excluded folder wasn’t being backed up.
In these situations, professional recovery software or a data recovery service may be necessary, particularly if the files were stored on an internal SSD.
Common Problems During File Restoration
Time Machine cannot find the backup disk
Try these steps:
- Disconnect and reconnect the drive.
- Try another USB cable or port.
- Restart your Mac.
- Ensure the backup drive appears in Disk Utility.
The Restore button is unavailable
This usually happens because:
- Nothing is selected.
- The backup is incomplete.
- The folder has no earlier versions.
Select a file or move to another backup date.
Restoring takes a long time
Large files can take several minutes or longer.
The restore speed depends on:
- USB connection speed
- Backup drive performance
- File size
- Network speed for wireless backups
Avoid disconnecting the backup drive until the process finishes.
The restored file is outdated
Time Machine restores exactly what existed during that backup.
If the backup was several days old, any changes made afterward won’t be included.
Check a more recent backup if one exists.
Tips to Get the Most from Time Machine
A few habits can make future recovery much easier.
- Keep your backup drive connected regularly.
- Verify backups occasionally instead of assuming they’re working.
- Replace aging external drives before they begin failing.
- Leave enough free space on the backup disk.
- Back up before major macOS updates.
- Use descriptive filenames so older versions are easier to identify.
These simple practices reduce the chances of discovering missing or outdated backups when you need them most.
Common Mistakes to Avoid
Many failed recoveries happen because of small mistakes.
Avoid these common issues:
- Disconnecting the backup drive during restoration.
- Assuming every deleted file was backed up.
- Overwriting the only good copy without checking it first.
- Forgetting that excluded folders are not backed up.
- Waiting months before confirming Time Machine is creating successful backups.
Restoring cautiously helps prevent accidental loss of newer files.
Alternatives if Time Machine Doesn’t Have the File
If Time Machine can’t recover your data, you still have a few options.
Check iCloud Drive
If the file was stored in iCloud Drive, look for:
- Recently Deleted
- Previous versions
- Files synchronized to another Apple device
Look in Cloud Storage Services
Services such as Dropbox, Google Drive, and OneDrive often include version history and deleted file recovery.
These features can recover files even when they no longer exist on your Mac.
Use Data Recovery Software
If the file was never backed up but was recently deleted, recovery software may be able to scan your storage device for recoverable data.
This approach works best if you stop using the Mac immediately after noticing the data loss. Continued use can overwrite deleted data, making recovery less likely.
Frequently Asked Questions
Can Time Machine restore files after the Trash has been emptied?
Yes. If the file existed in a previous Time Machine backup, emptying the Trash does not remove it from the backup.
Can I restore files without restoring my whole Mac?
Yes. Time Machine lets you recover individual files, folders, or older versions of documents without affecting the rest of your system.
Can Time Machine restore files to another Mac?
Yes. Connect the backup drive to another Mac and browse the Time Machine backup. Depending on file permissions and macOS version, you can restore individual files without restoring the entire system.
How long does Time Machine keep backups?
Time Machine keeps backups until the backup disk becomes full. At that point, it automatically deletes the oldest backups to free up space.
Why can’t I find my deleted file?
The file may have been created after the last successful backup, excluded from backups, or removed before Time Machine had a chance to save it.
Final Thoughts
Learning how to use Time Machine to restore lost files is one of the most valuable skills for any Mac user. Whether you’ve accidentally deleted a document, need an earlier version of a project, or want to recover an entire folder, Time Machine provides a reliable way to retrieve data without complicated recovery tools.
The key is making sure your backups are running regularly before something goes wrong. Once Time Machine is configured and creating successful backups, restoring lost files usually takes only a few minutes, giving you a straightforward way to recover important data when you need it most.
Related Articles
- How to Reset MacBook SMC and When You Should Do It
- How to Update macOS Safely Without Losing Data
- How to Reduce Memory Usage on MacBook
- How to Manage iCloud Storage on MacBook
If you think there’s been a mistake here, please do let us know by commenting on this post or Contact Us. And a member of our Content Integrity Team will review this decision with you.





This Post Has One Comment