

A MacBook keyboard collects more than visible dust. Skin oils, crumbs, lint, and tiny particles can build up between the keys over time, making the keyboard feel sticky, reducing key travel, or causing certain keys to respond inconsistently.
If you’ve searched for how to clean a MacBook keyboard safely, the goal is usually simple: remove dirt without damaging the keyboard, display, or internal electronics.
Cleaning a MacBook keyboard is straightforward when you use the right materials and follow the correct order. The biggest mistakes happen when people use excessive liquid, harsh cleaners, or compressed air incorrectly.
A few minutes of careful cleaning can keep the keyboard looking good and help prevent dirt from interfering with normal operation.
Why MacBook Keyboards Need Regular Cleaning
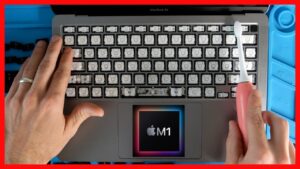
Unlike many desktop keyboards, a MacBook keyboard is built into the laptop. Dirt has fewer places to escape, and debris can become trapped around the keycaps.
Over time, you may notice:
- Dust gathering around key edges
- Fingerprint buildup on frequently used keys
- Sticky or slow-feeling keys
- Small crumbs between keys
- Reduced typing comfort
Cleaning won’t fix a hardware failure, but it often improves the feel of keys that have become dirty from normal everyday use.
If liquid has been spilled on the keyboard, cleaning alone is unlikely to solve the problem. Liquid damage requires a different approach and, in many cases, professional repair.
Know Which MacBook Keyboard You Have
Apple has used several keyboard designs over the years.
| Keyboard Type | MacBook Models | Cleaning Notes |
|---|---|---|
| Butterfly Keyboard | Most MacBooks from 2015 to 2019 | More sensitive to dust and debris. Clean gently and follow Apple’s recommended angles when using compressed air. |
| Magic Keyboard | Most MacBooks from late 2019 onward | More durable but still requires careful cleaning. Avoid excessive moisture. |
If you aren’t sure which keyboard your MacBook has, you can check your Mac model by selecting Apple menu > About This Mac.
The cleaning principles remain nearly the same for both designs.
What You’ll Need
Using proper cleaning supplies reduces the chance of accidental damage.
Recommended items include:
- Microfiber cloth
- Soft anti-static brush or camera lens brush
- Cotton swabs for tight spaces
- 70% isopropyl alcohol wipes or a microfiber cloth lightly dampened with 70% isopropyl alcohol
- A manual air blower or compressed air used carefully
Avoid using:
- Paper towels that can scratch surfaces
- Bleach
- Window cleaner
- Acetone
- Household disinfectant sprays unless specifically approved for electronics
- Excess water
- Aerosol cleaners sprayed directly onto the keyboard
If you’re using compressed air, avoid turning the can upside down because liquid propellant can escape and damage the keyboard.
Before You Start Cleaning
Taking a few precautions makes the process much safer.
- Save your work.
- Shut down the MacBook completely.
- Disconnect the charging cable.
- Unplug external devices.
- Allow the MacBook to cool if it has been under heavy use.
- Work on a clean, dry surface with good lighting.
Turning the computer off prevents accidental key presses and reduces the risk of electrical problems if a small amount of moisture reaches the keyboard.
Step 1: Remove Loose Dust and Debris
Always begin with dry cleaning before introducing any cleaning solution.
Hold the MacBook at roughly a 75-degree angle rather than laying it flat.
Use a soft air blower or carefully applied compressed air to remove loose debris.
Spray in short bursts from left to right across the keyboard.
Rotate the MacBook slightly and repeat from another angle.
This helps dislodge particles trapped beneath key edges.
If you don’t have compressed air, a soft anti-static brush works well for everyday dust removal.
Avoid inserting sharp objects between the keys. Plastic tools marketed for electronics cleaning are safer than metal picks.
Step 2: Wipe the Keys
Most visible grime comes from skin oils.
Lightly dampen a microfiber cloth with 70% isopropyl alcohol if you’re not using pre-moistened alcohol wipes.
The cloth should feel barely damp, not wet.
Wipe:
- Individual keys
- Palm rests
- The area surrounding the keyboard
- The Touch ID button carefully
- The trackpad if needed
Never pour alcohol directly onto the keyboard.
Any liquid should always go onto the cloth first.
Use gentle circular motions instead of pressing firmly.
Step 3: Clean Between the Keys
Dust often collects in narrow gaps.
A cotton swab slightly dampened with isopropyl alcohol can remove dirt around the key edges.
Roll the swab gently around each key instead of pushing downward.
Replace the swab once it becomes dirty.
This prevents spreading grime back across the keyboard.
Take your time around the space bar and return key, where debris commonly accumulates.
Step 4: Let Everything Dry
Although isopropyl alcohol evaporates quickly, give the keyboard several minutes to dry before turning the MacBook back on.
Inspect the keyboard under bright light.
If fingerprints remain, wipe them again with a clean microfiber cloth.
The surface should look clean without streaks or moisture.
What if a Key Feels Sticky?
A sticky key doesn’t always mean something is broken.
Sometimes oils or dried residue around the key restrict movement.
Start by cleaning around the affected key using compressed air followed by a lightly dampened microfiber cloth.
Press the key repeatedly after cleaning to help loosen remaining debris.
If the key continues sticking after multiple cleanings, the cause may be:
- Internal debris
- Wear inside the switch
- Liquid damage
- Mechanical failure
Avoid trying to remove individual keycaps unless you know your exact MacBook model and understand the removal procedure. Modern MacBook keycaps use delicate retaining clips that can break easily.
Replacing broken clips often costs more than routine cleaning would have.
Can You Use Disinfecting Wipes?
Yes, but only certain types.
Apple permits using wipes containing 70% isopropyl alcohol or similar disinfecting products designed for electronics.
The wipe should be damp rather than dripping.
Never allow moisture to enter:
- Key openings
- Speaker holes
- USB-C ports
- Headphone jack
- Ventilation openings
Do not use bleach-based wipes or abrasive cleaning pads.
Common Cleaning Mistakes to Avoid
Many keyboard problems happen because of cleaning methods rather than dirt itself.
Avoid these mistakes:
- Spraying liquid directly onto the keyboard
- Using excessive force while wiping
- Removing keycaps unnecessarily
- Using high-pressure air compressors
- Cleaning while the MacBook is powered on
- Using rough cloths that may scratch the finish
- Leaving moisture trapped around the keys
Another common mistake is assuming more cleaning solution works better.
In reality, the safest cleaning uses as little liquid as possible.
How Often Should You Clean a MacBook Keyboard?
The ideal schedule depends on how you use your laptop.
For most people:
| Usage | Suggested Cleaning |
|---|---|
| Daily office use | Every two to four weeks |
| Heavy typing | Every one to two weeks |
| Shared computer | Weekly |
| Dusty environments | Weekly with regular dust removal |
| Occasional use | Monthly |
A quick wipe every few weeks prevents heavy buildup that later requires more effort to remove.
Tips to Keep Your Keyboard Cleaner Longer
Regular habits reduce the amount of cleaning you’ll need.
Some simple practices include:
- Wash your hands before long typing sessions.
- Avoid eating over your MacBook.
- Keep drinks away from the keyboard.
- Close the lid when the laptop isn’t in use.
- Store the MacBook in a protective sleeve during travel.
- Remove dust regularly before it becomes packed around the keys.
These habits also reduce wear on the keyboard surface over time.
When Cleaning Won’t Solve the Problem
Sometimes the keyboard needs repair rather than cleaning.
Cleaning is unlikely to help if:
- Multiple keys stop responding completely.
- The keyboard has liquid damage.
- Keys register twice when pressed.
- Keys fall off or no longer stay attached.
- The keyboard works intermittently after a spill.
- Certain keys remain stuck even after careful cleaning.
Software issues can also cause typing problems. Before assuming the keyboard is dirty, test it in another application or create a temporary user account to rule out software settings.
If the problem began immediately after dropping the MacBook or spilling liquid on it, internal damage is more likely than dirt buildup.
Frequently Asked Questions
Can I vacuum my MacBook keyboard?
A small electronics vacuum with very low suction can remove loose dust, but standard household vacuums create static electricity and excessive suction. A microfiber cloth and air blower are safer choices.
Is rubbing alcohol safe for MacBook keyboards?
Yes. A microfiber cloth lightly dampened with 70% isopropyl alcohol is generally safe for cleaning the keyboard surface. Never soak the cloth or apply alcohol directly to the keys.
Can I remove MacBook keys to clean underneath?
For most users, no. Modern MacBook keycaps are delicate and can break during removal. Cleaning around the keys is much safer.
Does compressed air damage MacBook keyboards?
Not when used correctly. Hold the can upright, use short bursts, and avoid spraying too closely. High-pressure air or an inverted can may cause damage.
Can dirt make keys stop working?
It can, particularly if debris becomes lodged beneath the key mechanism. However, failed switches, liquid damage, or hardware faults can produce similar symptoms.
Final Thoughts
Learning how to clean a MacBook keyboard safely is mostly about avoiding unnecessary risks. Dry cleaning should always come first, followed by gentle wiping with a microfiber cloth and a small amount of 70% isopropyl alcohol when needed.
Using minimal moisture, avoiding harsh chemicals, and resisting the temptation to remove keycaps will protect both the keyboard and the laptop.
A simple cleaning routine every few weeks is usually enough to prevent dust, fingerprints, and debris from building up. If a key still sticks or stops responding after careful cleaning, the issue is likely mechanical rather than cosmetic, and further troubleshooting or professional service may be the better solution.
Related Articles
- How to Reduce Memory Usage on MacBook
- How to Fix MacBook Webcam Not Working: 12 Proven Solutions That Actually Work
- Laptop Battery Drains Overnight Even When Shut Down: Causes and Fixes for Windows and Mac
- How to Speed Up an Old MacBook Without Replacing Hardware
If you think there’s been a mistake here, please do let us know by commenting on this post or Contact Us. And a member of our Content Integrity Team will review this decision with you.





