

A MacBook keyboard that suddenly stops responding can make even simple tasks frustrating. Sometimes only one or two keys stop working. In other cases, an entire row becomes unresponsive or the whole keyboard fails to register any input. The cause can be as simple as temporary software interference or as serious as hardware damage.
The good news is that many keyboard problems can be diagnosed and fixed without replacing the MacBook. The key is to start with the simplest checks before moving to more advanced troubleshooting.
This guide walks through every practical solution, explains why each one works, and helps you determine when the problem is likely caused by hardware rather than macOS.
Understand the Type of Keyboard Problem
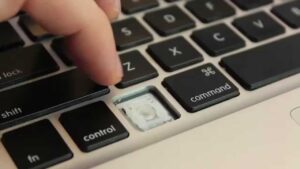
Before trying random fixes, identify exactly what the keyboard is doing.
Common symptoms include:
- One key doesn’t work.
- Several nearby keys don’t respond.
- Some keys require excessive force.
- Keys type the wrong character.
- The keyboard works only after restarting.
- The built-in keyboard stops working while an external keyboard works normally.
- Keys repeat continuously or become stuck.
Recognizing the pattern often points to the underlying cause. For example, a single non-working key is usually a physical issue, while the entire keyboard failing after a software update often indicates a software or firmware problem.
Check Whether the Problem Is Hardware or Software
One of the fastest ways to narrow down the cause is to determine whether macOS is responsible.
Try these checks:
- Restart the MacBook.
- Log into another user account.
- Open Notes or TextEdit and test every key.
- Connect an external USB or Bluetooth keyboard.
If the external keyboard works normally while the built-in keyboard does not, the problem is usually limited to the MacBook keyboard itself. If both keyboards behave incorrectly, macOS settings or software are more likely to be involved.
Restart Your MacBook
Restarting clears temporary processes that may interfere with keyboard input.
Select Apple menu > Restart, then test the keyboard again before opening many applications.
Avoid simply closing the lid and reopening it. A full restart reloads system services that control input devices.
If the keyboard works after restarting but later stops again, another application or background process may be interfering.
Clean the Keyboard Properly
Dust, crumbs, pet hair, and other debris commonly prevent individual keys from registering.
Turn off the MacBook before cleaning.
Apple recommends holding the notebook at roughly a 75-degree angle while using compressed air in short bursts across the keyboard. Rotate the computer and repeat from different angles to help dislodge trapped particles.
Do not:
- Pour liquid onto the keyboard.
- Insert sharp objects beneath keycaps.
- Use household vacuum cleaners that generate static electricity.
- Spray compressed air continuously into one location.
If only one or two keys fail while surrounding keys work normally, debris is often the cause.
Check Accessibility Keyboard Settings
Some macOS accessibility features intentionally change keyboard behavior.
Open:
System Settings > Accessibility > Keyboard
Review settings such as:
- Slow Keys
- Sticky Keys
- Mouse Keys
Slow Keys delays key recognition until a key is held for a specified time. Mouse Keys allows the numeric keypad to control the pointer instead of typing numbers.
Disable these options unless you intentionally use them.
Verify Keyboard Input Source
Typing the wrong symbols does not always indicate a broken keyboard.
Go to:
System Settings > Keyboard > Input Sources
Make sure the selected keyboard layout matches your physical keyboard.
For example, switching accidentally from a U.S. layout to another regional layout can cause punctuation and special characters to appear incorrectly even though the keyboard hardware is functioning normally.
Disconnect External Accessories
Certain USB hubs, docks, and third-party accessories can interfere with input devices.
Disconnect:
- USB hubs
- External keyboards
- Gaming accessories
- Docking stations
- USB adapters
Restart the MacBook with only the charger connected and test again.
Reconnect accessories one at a time to identify whether a specific device is causing the conflict.
Boot Into Safe Mode
Safe Mode starts macOS with only essential system components.
This helps determine whether login items, extensions, or third-party software are interfering with keyboard operation.
Apple Silicon Macs
- Shut down the MacBook.
- Hold the power button.
- Wait until startup options appear.
- Select the startup disk.
- Hold Shift.
- Choose Continue in Safe Mode.
Intel Macs
- Shut down the MacBook.
- Turn it on.
- Immediately hold Shift.
- Release the key when the login window appears.
Once logged in, test the keyboard.
If it works normally only in Safe Mode, the issue is probably caused by software loaded during a normal startup.
Check for macOS Updates
Apple regularly fixes keyboard, firmware, and driver-related bugs through macOS updates.
Open:
System Settings > General > Software Update
Install available updates and restart the MacBook afterward.
If the problem began immediately after updating macOS, wait for any available follow-up update, as Apple occasionally releases bug-fix updates shortly after major releases.
Remove Recently Installed Software
If the keyboard stopped working after installing a utility, uninstalling it may solve the problem.
Software that commonly affects keyboard behavior includes:
- Keyboard remapping utilities
- Macro software
- Automation tools
- Virtual machine software
- Security applications with input monitoring
- Third-party accessibility utilities
After removing the software, restart the MacBook before testing again.
Test Every Key Individually
It helps to know whether the issue affects isolated keys or larger sections of the keyboard.
Open a plain text document and press every key one by one.
Pay attention to:
- Keys that never register.
- Keys that register twice.
- Keys requiring excessive pressure.
- Modifier keys such as Shift, Control, Option, and Command.
If multiple adjacent keys fail together, the issue is more likely related to the keyboard hardware than software.
Reset the SMC on Intel MacBooks
Some Intel-based MacBooks use a System Management Controller (SMC), which manages several hardware functions.
If the keyboard behaves unpredictably and other hardware features are also acting strangely, resetting the SMC may help.
Apple silicon Macs do not require an SMC reset because that functionality is built into the processor and resets automatically during normal restarts.
The reset procedure varies depending on the Intel MacBook model, so follow the steps that apply to your specific device.
Reset NVRAM on Intel Macs
NVRAM stores certain hardware-related settings.
To reset it:
- Shut down the MacBook.
- Turn it on.
- Immediately hold Option + Command + P + R.
- Keep holding the keys for about 20 seconds.
- Release the keys and allow macOS to start.
This reset applies only to Intel models. Apple silicon Macs automatically manage these settings during startup.
Look for Signs of Liquid Damage
Even a small spill can damage the keyboard.
Warning signs include:
- Sticky keys
- Random repeated characters
- Corrosion around keys
- Several nearby keys failing together
- Keyboard problems appearing after moisture exposure
If liquid entered the keyboard, avoid repeatedly pressing the affected keys. Continued use may worsen internal corrosion.
If the spill was significant, professional inspection is usually the safest option.
Check Battery Swelling
A swollen battery can press against the keyboard from underneath, causing keys to stop working or feel uneven.
Signs include:
- Trackpad clicking poorly
- Bulging bottom case
- Uneven keyboard surface
- Gaps between the chassis and bottom cover
A swollen battery should not be ignored. Stop using the MacBook and arrange for service as soon as possible, as damaged lithium-ion batteries present a safety risk.
Run Apple Diagnostics
Apple Diagnostics checks many hardware components for faults.
To run it:
Apple Silicon Macs
- Shut down the MacBook.
- Hold the power button.
- Wait until startup options appear.
- Press Command + D if prompted, or follow the on-screen instructions, depending on the model and macOS version.
Intel Macs
- Disconnect unnecessary external devices.
- Shut down the MacBook.
- Turn it on while holding D.
- Release the key when Diagnostics starts.
If Apple Diagnostics reports a keyboard-related issue, note the reference code. It can help speed up the repair process if service is needed.
Know the Difference Between Butterfly and Magic Keyboards
The keyboard design in your MacBook affects the likelihood of hardware failure.
| Keyboard Type | Common Models | Typical Issues |
|---|---|---|
| Butterfly Keyboard | Many MacBook models released between 2015 and 2019 | Stuck keys, repeated letters, keys not responding due to dust or wear |
| Magic Keyboard | Most newer MacBook models from late 2019 onward | Generally more reliable, though still vulnerable to liquid damage and physical wear |
If your MacBook uses a butterfly keyboard and individual keys frequently stop responding despite cleaning, hardware replacement may be necessary.
When a Single Key Stops Working
If only one key fails:
- Clean around the key carefully.
- Restart the MacBook.
- Test in Safe Mode.
- Verify the key works in another user account.
- Check for visible physical damage.
If the key remains unresponsive while every other key works normally, the switch beneath that key may have failed.
Avoid attempting to remove keycaps unless you are familiar with your specific keyboard design. Improper removal can easily break the retaining clips, particularly on butterfly keyboards.
When the Entire Keyboard Stops Working
If no keys respond:
- Test with an external keyboard.
- Restart the MacBook.
- Disconnect accessories.
- Boot into Safe Mode.
- Install available macOS updates.
- Run Apple Diagnostics.
If the built-in keyboard remains completely unresponsive while an external keyboard works normally, hardware failure becomes much more likely.
Common Mistakes That Can Make the Problem Worse
Several well-intentioned fixes can create additional damage.
Avoid:
- Prying off keys with metal tools.
- Spraying cleaning fluid directly onto the keyboard.
- Using excessive compressed air pressure.
- Ignoring signs of liquid damage.
- Continuing to use a MacBook with a swollen battery.
- Installing unknown keyboard “driver” software from third-party websites. macOS includes the necessary keyboard support, so separate drivers are rarely needed.
When Professional Repair Is the Best Option
Software troubleshooting has limits. Professional service is usually the best choice if:
- Apple Diagnostics reports a hardware fault.
- Liquid entered the keyboard.
- Multiple keys remain unresponsive after all software fixes.
- Keys are physically broken.
- The keyboard works intermittently even after reinstalling macOS.
- The MacBook has visible internal damage or battery swelling.
A technician can determine whether the keyboard, top case, logic board, or another internal component needs repair or replacement.
Final Thoughts
If your MacBook keyboard keys are not working, start with the simplest solutions before assuming the keyboard has failed. Restart the MacBook, clean the keyboard, check accessibility settings, verify the correct input source, and test in Safe Mode. These steps often resolve software-related issues without requiring repairs.
When the problem affects only one or two keys, debris or physical wear is a common cause. If the entire keyboard stops responding, especially after you’ve ruled out software issues with an external keyboard and diagnostic testing, hardware damage becomes the more likely explanation. Working through the troubleshooting steps in order helps you avoid unnecessary repairs and makes it easier to identify when professional service is the right next step.
Related Articles
- How to Fix MacBook Stuck on Apple Logo During Startup
- How to Fix MacBook Wi-Fi Disconnecting Randomly
- How to Fix MacBook Webcam Not Working: 12 Proven Solutions That Actually Work
- How to Clean System Data Taking Too Much Storage on Mac
If you think there’s been a mistake here, please do let us know by commenting on this post or Contact Us. And a member of our Content Integrity Team will review this decision with you.





