

If System Data is taking up an unusually large amount of storage on your Mac, you’re not alone. Many Mac users discover that System Data consumes tens or even hundreds of gigabytes without any obvious explanation. The challenge is that macOS groups many different types of files under this category, making it difficult to know what is safe to remove.
The good news is that most cases can be resolved without reinstalling macOS or deleting personal files. The key is understanding what System Data includes, identifying what is consuming the space, and cleaning only the files that are no longer needed. This guide explains every practical method, why it works, when to use it, and what to avoid.
What Is System Data on Mac?
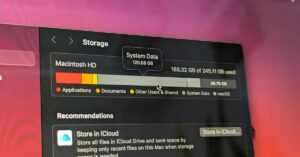
System Data is a storage category used by macOS for files that don’t fit neatly into categories like Applications, Photos, Documents, or Music.
Depending on your macOS version, System Data may include:
- System caches
- Application caches
- Log files
- Temporary files
- Virtual memory files
- Sleep image files
- Local Time Machine snapshots
- iPhone and iPad backups
- Software update files
- Browser caches
- Plug-ins and extensions
- Fonts
- Developer files
- Spotlight indexes
- Various support files created by applications
Older versions of macOS may label this category as Other instead of System Data.
Some storage is completely normal. If System Data grows unusually large and doesn’t shrink over time, it usually means temporary files are accumulating or snapshots and caches aren’t being removed automatically.
How to Check How Much Space System Data Is Using
Before deleting anything, confirm how much storage System Data actually occupies.
- Click the Apple menu.
- Open System Settings (or System Preferences on older versions).
- Select General > Storage.
- Wait while macOS calculates storage usage.
Storage analysis may take several minutes if your drive contains many files.
If System Data occupies dozens of gigabytes and your available storage is low, continue with the methods below.
Why System Data Becomes So Large
System Data usually grows because macOS temporarily stores files that improve performance or protect your data.
Common causes include:
- Large application caches
- Temporary installation files
- macOS update leftovers
- Local Time Machine snapshots
- Xcode developer data
- iPhone backups
- Large system logs
- Browser cache accumulation
- Virtual memory swap files
- Sleep image files
- Disk indexing
- Corrupted cache files
Sometimes the storage calculation itself is inaccurate. macOS may temporarily report a larger System Data size while indexing the drive or completing background maintenance.
Restart Your Mac First
This sounds simple, but it often frees several gigabytes.
Restarting removes many temporary files, clears inactive memory, and allows macOS to delete files scheduled for cleanup.
Choose:
Apple menu → Restart
After the restart, wait a few minutes and check Storage again.
If System Data is still unusually large, continue with the next methods.
Empty the Trash
Files remain on your drive until the Trash is emptied.
Open the Trash, review its contents, then choose Empty Trash.
If the Trash contains large folders or external drive files, removing them may immediately reduce System Data.
Delete Application Cache Files
Application caches help programs load faster. Over time, some applications build cache folders that grow to several gigabytes.
Open the Cache Folder
- Open Finder.
- Select Go > Go to Folder.
- Enter:
~/Library/Caches- Press Return.
Inside you’ll see folders created by different applications.
Avoid deleting the entire Caches folder itself.
Instead:
- Open unusually large application folders.
- Delete only their contents.
- Leave the folders in place.
Applications recreate cache files automatically when needed.
When This Method Helps
This works well if browsers, creative software, messaging apps, or video editors have accumulated large cache files.
Remove System Cache Files Carefully
macOS also stores system-level caches.
Open:
/Library/CachesAdministrator permission may be required.
Delete only obvious temporary cache contents.
Avoid removing files if you’re unsure of their purpose. System caches are generally smaller than user application caches, so aggressive cleaning usually isn’t necessary.
Delete Old Log Files
Applications continuously create logs for troubleshooting.
Normally these remain small, but software errors can generate gigabytes of logs.
Visit:
~/Library/Logsand
/Library/LogsDelete outdated log files if they are unusually large.
If an application immediately recreates massive logs, the application itself likely has a problem that should be updated or reinstalled.
Remove iPhone and iPad Backups
If you’ve backed up an iPhone or iPad using Finder, those backups can consume tens of gigabytes.
Open:
Finder → Your iPhone → Manage Backups
Delete backups you no longer need.
You can also check:
~/Library/Application Support/MobileSync/BackupOnly remove backups you’re certain you won’t need for restoring a device.
Delete Local Time Machine Snapshots
This is one of the biggest reasons System Data grows unexpectedly.
Even if you use an external Time Machine drive, macOS creates local snapshots whenever the backup drive isn’t available.
These snapshots help restore recently changed files.
Normally macOS deletes them automatically, but sometimes they remain longer than expected.
Check Existing Snapshots
Open Terminal and run:
tmutil listlocalsnapshots /If many snapshots appear, they may be consuming substantial storage.
Thin Snapshots
Run:
sudo tmutil thinlocalsnapshots / 10000000000 4Or delete a specific snapshot:
sudo tmutil deletelocalsnapshots YYYY-MM-DD-HHMMSSReplace the date with one shown by the previous command.
When to Use This Method
Use this only if Time Machine snapshots occupy significant storage.
If you rely heavily on Time Machine, avoid deleting recent snapshots unless space is urgently needed.
Clear Browser Cache
Browsers can quietly consume several gigabytes.
Check browsers such as:
- Safari
- Chrome
- Firefox
- Edge
Each browser provides an option to clear cached website data.
This removes temporary website files but does not necessarily delete saved passwords or bookmarks unless you choose those options.
Remove Downloaded macOS Update Files
Sometimes interrupted macOS updates leave installation files behind.
Look inside:
/Library/UpdatesIf update packages remain after installation, they can usually be removed safely.
Delete Xcode Developer Files
If you’ve installed Xcode, developer data can become enormous.
Common storage users include:
- DerivedData
- Device Support
- Archives
- Simulators
These folders may consume tens of gigabytes.
Typical locations include:
~/Library/DeveloperDevelopers often recover significant storage simply by deleting old simulator data and archived builds.
If you don’t use Xcode, this section can be ignored.
Find Large Hidden Files
Sometimes a single forgotten file is responsible for most of System Data.
Finder can help locate large files.
Open Finder and search for:
- File Size is greater than 1 GB
You can also sort folders by size using storage management tools.
Large video exports, virtual machine images, disk images (.dmg), and ZIP archives are common storage culprits.
Check for Virtual Machine Files
Applications such as virtualization software often store massive disk images.
Examples include virtual machines used for:
- Windows
- Linux
- Older macOS versions
These files are not always categorized under Documents.
If you no longer use a virtual machine, removing it can recover dozens or even hundreds of gigabytes.
Remove Old Disk Images
Downloaded installer images (.dmg) are easy to forget.
Search your Mac for:
.dmgDelete installers you’ve already used.
This won’t uninstall applications already installed from those images.
Optimize Storage Using macOS
macOS includes built-in storage management tools.
Open:
System Settings → General → Storage
Depending on your macOS version, you’ll see recommendations such as:
- Store files in iCloud
- Optimize Storage
- Empty Trash Automatically
- Review Large Files
These recommendations won’t solve every System Data problem, but they often help reclaim storage safely.
Use Safe Mode if Storage Doesn’t Update
Sometimes macOS reports incorrect storage totals because caches haven’t been rebuilt.
Starting in Safe Mode forces several maintenance tasks.
The startup process differs between Intel Macs and Apple silicon Macs.
After starting in Safe Mode:
- Wait several minutes.
- Restart normally.
- Check Storage again.
Many users find System Data decreases after Safe Mode completes maintenance.
Update macOS
Occasionally a storage reporting bug is fixed in a macOS update.
Open:
System Settings → General → Software Update
Install available updates if your Mac is compatible.
Updating can also remove leftover files created by older versions of macOS.
What You Should Never Delete
Some folders appear large but should not be removed manually.
Avoid deleting:
/System/Library- Hidden system files you don’t recognize
- Random Terminal files found online
- Protected macOS components
Deleting the wrong files can make applications unstable or even prevent macOS from starting correctly.
When in doubt, leave system folders untouched.
Common Mistakes That Can Make the Problem Worse
Many storage cleanup guides recommend deleting everything inside the Library folder. That approach can create new problems.
Avoid these mistakes:
- Deleting unknown system files
- Removing Time Machine data without understanding snapshots
- Using Terminal commands copied from untrusted websites
- Deleting active application support folders
- Installing aggressive “cleaner” utilities that remove essential files
Most storage problems can be solved with the built-in tools included in macOS.
Troubleshooting When System Data Still Won’t Shrink
If you’ve completed every step and System Data remains unusually large, work through these checks.
Check if Spotlight Is Indexing
Spotlight indexing temporarily increases storage activity.
Open Terminal:
mdutil -s /If indexing is still running, wait until it finishes before judging storage usage.
Look for Runaway Applications
Some applications continuously generate logs or cache files because of bugs.
Open Activity Monitor and monitor applications with unusually high disk activity.
Updating or reinstalling the affected application often resolves the issue.
Wait for macOS to Recalculate Storage
Storage categories are not updated instantly.
After deleting large files, wait several minutes or restart your Mac.
Sometimes the reported System Data size doesn’t change immediately even though space has already been recovered.
When System Data Size Is Actually Normal
Not every large System Data category indicates a problem.
Depending on your workflow, larger System Data is expected if you:
- Edit 4K or 8K videos
- Use Xcode
- Run virtual machines
- Frequently back up iPhones
- Install large macOS updates
- Work with professional creative applications
In these cases, cleaning caches may recover some space, but the category will naturally grow again as you continue using those tools.
Final Thoughts
Cleaning System Data taking too much storage on Mac usually comes down to removing unnecessary caches, local Time Machine snapshots, outdated backups, temporary files, and developer data while leaving essential macOS files untouched. Start with the safest methods, such as restarting your Mac, emptying the Trash, clearing application caches, and reviewing large files. If storage is still unusually high, inspect local snapshots, logs, and hidden developer files.
After reclaiming space, make it a habit to review storage every few months. Regular maintenance helps prevent System Data from growing unchecked and reduces the chances of running into low storage warnings when you need space most.
Related Articles
- How to Stop MacBook Screen From Dimming Automatically
- How to Fix AirDrop Not Working Between MacBook and iPhone
- How to Use Time Machine to Restore Lost Files on Your Mac
- How to Remove Startup Apps Slowing Down Your MacBook
If you think there’s been a mistake here, please do let us know by commenting on this post or Contact Us. And a member of our Content Integrity Team will review this decision with you.





