

A MacBook that used to boot in seconds and now takes half a minute or more to become usable almost always has the same culprit: too many apps loading themselves the moment you log in. Each one claims a slice of your CPU, memory, and disk activity before you’ve even opened a browser tab, and the effect compounds every time you install something new that quietly adds itself to the startup list.
The good news is that fixing this doesn’t require any special software or technical skill. macOS gives you direct control over what launches at login, and once you know where to look, cleaning it up takes a few minutes.
Why Startup Apps Slow Down a MacBook
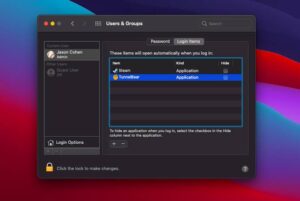
When you turn on or restart a Mac, macOS has to load the operating system itself, then hand control over to a long list of background processes and user applications that have registered themselves to run automatically. Some of these are essential system services. Others are apps you installed for a single purpose months ago that never stopped launching.
The slowdown happens for a simple reason: your MacBook’s processor and storage can only do so many things at once. If fifteen apps are all trying to initialize, check for updates, connect to the internet, and load their interface at the same time, everything takes longer, including the things you actually want to do, like opening Safari or Mail.
This is more noticeable on older MacBooks or ones with less RAM, but even a new machine can feel sluggish if the startup list has grown out of control. It’s also common after installing a lot of software over time, since many installers add a login item by default without asking.
How to Tell Which Apps Are Actually Slowing You Down
Before removing anything, it helps to know what’s actually running. Open Activity Monitor, which you can find through Spotlight search (Command + Space, then type “Activity Monitor”) or in Applications > Utilities.
Click the CPU tab and sort by the “% CPU” column to see what’s using processing power right after startup. Then check the Memory tab to see which apps are consuming the most RAM. Apps that show high usage consistently, even when you’re not actively using them, are strong candidates for removal from your login items.
You can also check Activity Monitor’s Energy tab, which has a column showing “Energy Impact.” High-impact background apps drain both performance and battery life, so this is a useful cross-check if you’re deciding what to cut first.
Removing Startup Apps in System Settings (macOS Ventura and Later)
Apple changed how this works starting with macOS Ventura (13), and the process is now more visual and easier to manage than in older versions.
- Click the Apple menu in the top-left corner and choose System Settings.
- Scroll down and select General in the sidebar.
- Click Login Items.
- Under “Open at Login,” you’ll see every app currently set to launch automatically.
- Select an app you don’t want starting automatically and click the minus (–) button below the list.
- Repeat for each app you want to remove.
You’ll also notice a second section on this screen called “Allow in the Background.” This lists apps and system services permitted to run background tasks even when they’re not open, separate from apps that visibly launch at login. If something like a cloud storage sync tool or a background updater is eating resources, you may want to toggle it off here too, though be aware this can affect features like automatic syncing or notifications for that app.
Changes take effect immediately, but you won’t see the full performance difference until your next restart, since already-running background processes don’t necessarily stop the moment you remove them from the list.
Removing Startup Apps in macOS Monterey and Earlier
If you’re running macOS Monterey (12) or an older version, the login items list lives in a different place.
- Click the Apple menu and choose System Preferences.
- Select Users & Groups.
- Click your username in the left sidebar.
- Click the Login Items tab.
- Select the app you want to stop from launching and click the minus (–) button.
This older interface doesn’t separate background permissions the way Ventura does, so removing an app from this list is usually enough to stop both its visible window and most of its background activity, though some apps run helper processes that persist regardless, which is covered further down.
Checking Inside Individual Apps
Not every app that launches at startup shows up cleanly in the system login items list. Many apps, especially utilities, communication tools, and creative software, have their own internal setting for this, and if you only remove them through System Settings, they can sometimes re-add themselves the next time you open the app or install an update.
Common places to check:
- Menu bar apps (Dropbox, Spotify, messaging apps, VPN clients): open the app, go to its Preferences or Settings, and look for an option like “Open at login” or “Launch at startup.”
- Adobe Creative Cloud, Microsoft Office apps, and similar suites: these often have a background helper (like Creative Cloud Desktop or Microsoft AutoUpdate) that runs separately from the main application and needs to be disabled in its own settings panel.
- Antivirus or system utility software: these are usually designed to always run in the background for protection, so disabling their startup behavior may reduce the protection they offer. Weigh that tradeoff before turning them off.
Checking inside the app itself is more reliable for apps that are aggressive about restoring their own login item, since it addresses the setting at the source rather than just removing the symptom.
Finding and Removing Hidden Login Items and Launch Agents
Some background processes don’t appear in the standard Login Items list at all. These are typically installed as Launch Agents or Launch Daemons, which are configuration files that tell macOS to run a specific process automatically, often without any visible app window.
These are usually installed by legitimate software (browser extensions, hardware drivers, backup tools) but can also come from less reputable sources. You can view them manually:
- Open Finder.
- Press Command + Shift + G to open the “Go to Folder” dialog.
- Type
~/Library/LaunchAgentsand press Enter. This shows agents that run for your user account only. - Also check
/Library/LaunchAgentsand/Library/LaunchDaemons, which apply system-wide and typically require administrator access to modify.
Each entry is a .plist file, and the name usually hints at which app it belongs to (for example, com.adobe.something.plist). If you recognize an app you no longer use, you can move the file to the Trash. If you don’t recognize the name, it’s worth searching it before deleting anything, since some of these files are tied to essential system functions or drivers for hardware like your trackpad or keyboard.
This method is more advanced than the System Settings approach and carries more risk if you remove something you shouldn’t, so it’s best treated as a secondary step for stubborn cases rather than your first move.
Using Third-Party Cleanup Tools
Apps like CleanMyMac, App Cleaner & Uninstaller, and similar utilities can scan for login items and launch agents and present them in a friendlier interface than digging through folders manually. They can be useful if you’re not comfortable navigating the file system, and some can fully uninstall an app along with all of its associated background processes in one step, which Apple’s own tools don’t do.
That said, they’re not strictly necessary. Everything they do can be done manually using the methods above, and installing yet another background utility to fix a startup slowdown problem is a bit counterproductive if you’re not going to use its other features. If you do use one, stick to well-reviewed, established software, since disk cleanup and system utility apps are a common category for scams and low-quality software on the Mac App Store and elsewhere.
Restarting to Confirm the Fix
After removing login items, restart your MacBook rather than just logging out and back in. A full restart clears cached processes more thoroughly and gives you an accurate read on how much the changes actually helped.
Time how long it takes from the login screen to being able to open an app comfortably, and compare that to before. Open Activity Monitor again a minute or two after startup and check whether the same apps that were previously hogging CPU and memory have quieted down.
If the improvement is smaller than expected, it usually means either a launch agent outside the standard list is still active, or the slowdown has another cause entirely, such as a nearly full startup disk, a failing drive, or a browser with too many extensions loading on launch.
What to Do If Removing Startup Apps Doesn’t Fix It
Startup apps are the most common reason a MacBook feels slow to boot, but they’re not the only one. If performance issues persist after cleaning up login items, check these as well:
- Available storage space: macOS needs free space on your startup disk to manage virtual memory efficiently. Less than 10-15% free space can cause slowdowns across the entire system, not just at startup.
- RAM limitations: Older MacBooks with 4GB or 8GB of RAM will struggle regardless of login items if you’re running memory-heavy apps like video editors or many browser tabs simultaneously.
- A full or failing startup drive: Check Disk Utility for errors, and consider whether the MacBook is due for storage cleanup or, in older models, an SSD upgrade.
- Spotlight indexing after a system update: If you’ve just updated macOS or moved a lot of files, Spotlight may be reindexing your drive in the background, which temporarily slows everything down until it finishes.
- Too many browser extensions: These load when your browser opens, not necessarily at system startup, but they contribute to the same feeling of general sluggishness right after logging in.
Frequently Asked Questions
Will removing startup apps delete them from my MacBook? No. Removing an app from your login items only stops it from launching automatically. The app itself stays installed and you can still open it manually anytime.
Is it safe to remove all startup apps? Most third-party apps are safe to remove from login items. Be more careful with system utilities, antivirus software, and anything related to hardware drivers (like software for an external mouse, keyboard, or monitor), since removing these can disable features you rely on rather than just improving speed.
Why does an app keep adding itself back to Login Items after I remove it? This usually happens because the setting is also controlled from inside the app itself. Check the app’s own preferences for a “launch at login” or “open at startup” option and disable it there as well.
Does closing an app’s window stop it from running in the background? Not always. On macOS, many apps continue running as background processes even after you close their window, especially menu bar apps. You often need to quit them fully (right-click the Dock icon and choose Quit, or use Command + Q) to stop the process entirely.
Will this drain less battery too? Yes. Fewer background processes running means less continuous CPU activity, which directly improves battery life, not just startup speed.
Conclusion
A slow-starting MacBook is rarely a hardware problem in disguise. It’s usually the accumulated result of years of installing apps that quietly added themselves to your login process, one at a time, until the list grew long enough to notice.
Going through System Settings, checking individual app preferences, and, if needed, looking at launch agents directly will address the vast majority of startup slowdowns. Combine that with a restart to confirm the results, and if things are still sluggish afterward, look at storage space and RAM usage as the next likely causes. Keeping an eye on your login items every few months, especially after installing new software, is the simplest way to stop this problem from creeping back in.
Related Articles
- How to Fix MacBook Wi-Fi Disconnecting Randomly
- How to Create a Bootable macOS Installer USB
- How to Optimize MacBook Battery Health for Long-Term Use
- How to Connect Two External Monitors to a MacBook
If you think there’s been a mistake here, please do let us know by commenting on this post or Contact Us. And a member of our Content Integrity Team will review this decision with you.





This Post Has 2 Comments