The safest way to transfer data from Android to iPhone is to use Apple’s official migration process during the iPhone’s initial setup. Depending on your devices and software versions, you can use the Move to iOS app on Android, a direct USB-C cable connection, or, on supported newer devices, Apple’s newer transfer-without-the-app option.
These methods can move important information such as contacts, messages, photos, videos, calendars, files, and other supported data, but they do not make Android and iPhone identical. Some apps, passwords, media, and app-specific data require separate handling.
The most important thing is to avoid erasing the Android phone until you have checked the iPhone carefully. A transfer can appear successful while a particular category, such as a few files, messages, or account data, still needs attention.
What You Can Transfer from Android to iPhone
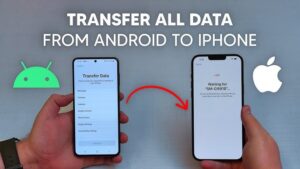
The exact data available for transfer depends on the devices, operating systems, apps, and method you use. Apple’s official transfer process is designed to move common personal information rather than reproduce the entire Android operating system on the iPhone.
Supported content can include:
- Contacts
- Text messages and message attachments
- Photos and videos
- Calendars
- Mail accounts
- Files and folders
- Web bookmarks
- Some accessibility and display settings
- WhatsApp messages and media
- Some free apps that exist on both Google Play and Apple’s App Store
Apple also provides manual transfer methods for content that does not move automatically. This is particularly useful for music, books, PDFs, documents, and data stored in services that are already cloud-based.
There is an important distinction between transferring data and transferring apps. An Android APK cannot simply be copied to an iPhone and installed. The iPhone needs the iOS version of an app from the App Store, and some apps have no iOS equivalent.
Likewise, an app’s data may not transfer just because the app itself is available on iPhone. Apps that store information in their own cloud accounts often require you to sign in again. Others have their own migration procedure.
Before You Transfer Data from Android to iPhone
A few minutes of preparation can prevent a failed transfer or missing files.
Check the iPhone’s available storage
Look at how much storage is available on the new iPhone and compare it with the amount of content on your Android phone.
If your Android phone contains more data than the iPhone can hold, the migration cannot complete normally. Apple specifically advises checking available storage before transferring, including content stored on an external microSD card.
You do not necessarily need to copy everything. Large videos, downloads, offline music, and old files can consume considerable space. Clean up unnecessary content before migration if the iPhone has less storage than the Android device.
Charge both phones
Keep both devices connected to power during the transfer when possible. A transfer involving thousands of photos and videos can take considerably longer than moving contacts and messages.
Do not start with an Android phone that is nearly out of battery. If it shuts down in the middle of the migration, you may need to restart the process.
Update the Android phone
Install available system and app updates, particularly updates to Chrome if you want to transfer Chrome bookmarks. Apple specifically recommends updating Chrome on Android before moving bookmarks.
You should also make sure the Move to iOS app, when required, is up to date.
Back up important information first
A transfer is not a substitute for a backup.
Keep your existing Android phone intact until you have confirmed that important contacts, photos, messages, documents, and app data are available on the iPhone. A Google Account backup can provide an additional safety net for information that is already synchronized with Google services.
This matters most for irreplaceable photos, videos, documents, and authentication information. Do not factory-reset the Android phone immediately after seeing the transfer-complete message.
The Best Method: Use Move to iOS
For most Android-to-iPhone migrations, Move to iOS is the simplest official option when setting up the iPhone for the first time.
Apple’s process requires the iPhone to be at its initial setup stage. If you have already completed iPhone setup, Apple says you generally need to erase the iPhone and start again to use the automated Move to iOS process, or transfer your content manually instead.
Step 1: Prepare both phones
Turn on Wi-Fi on the Android phone and connect both devices to power.
Keep the phones close together throughout the process. If you are transferring a large amount of data, avoid using either phone for other tasks until the migration is finished.
Step 2: Install Move to iOS on Android
On the Android phone, install Apple’s Move to iOS app from Google Play.
If your Android phone cannot access Google Play, Apple provides an alternative process for obtaining the app. The exact availability and procedure can vary by device.
Step 3: Start iPhone setup
Turn on the new iPhone and follow the setup screens.
When you reach Transfer Your Apps & Data, select From Android.
The iPhone will provide instructions for connecting the Android phone to the migration process.
Step 4: Open Move to iOS
Open Move to iOS on the Android phone and follow its instructions.
The iPhone will display a temporary security code. Enter that code into the Android phone when requested.
The devices then establish a private connection for the migration.
Step 5: Choose what to transfer
The Android phone will show the types of information that can be moved.
Select the categories you want to transfer. Depending on the devices and software versions, this can include contacts, message history, photos, videos, calendars, files, and other supported information.
Do not assume that selecting everything means every Android app and every piece of app data will be copied. The transfer system works with supported categories and compatible applications, not with a complete clone of the Android phone.
Step 6: Leave the phones alone
Once the transfer starts, keep the devices connected and near each other.
This is one of the easiest parts of the process to get wrong. Switching apps, interrupting the connection, restarting a phone, or otherwise interfering with the migration can cause it to stop.
Wait until the iPhone’s progress indicator has completed and the Android phone indicates that the transfer has finished.
Using a USB-C Cable Can Be Better for Large Transfers
If both phones support a suitable USB-C connection, a direct cable can be a good choice, especially when moving a large photo or video library.
Apple currently states that you can connect an Android device directly to an iPhone with a USB-C cable for a faster transfer.
The advantage is that you are not relying solely on a wireless connection between the phones. A wired connection can also be more practical when transferring a large amount of data.
Use a cable that supports data transfer, not one that is intended only for charging. If the connection is not recognized, try another known-good cable.
The cable method does not change the basic migration process. You still begin from the iPhone setup screen, select the Android transfer option, and follow the instructions displayed on both devices.
Newer iPhones May Support Transfer Without the Move to iOS App
Apple has introduced a newer transfer option for supported combinations of devices and software.
Apple’s current support documentation says that supported Android devices running a compatible version of Android 17 can transfer to iOS without installing the Move to iOS app. On compatible iPhones running iOS 26.5, the setup process can provide a Transfer without App option.
The process works by placing the Android and iPhone close together and using the Android camera to scan a QR code displayed by the iPhone. The exact availability depends on device and software compatibility.
If your iPhone does not show Transfer without App, do not assume something is wrong. Use the standard Move to iOS method instead.
This newer option is particularly useful when the Android phone cannot use Google Play or when the supported devices provide the feature directly during setup.
What Happens to Your Apps?
Apps are one of the areas where Android-to-iPhone transfers are commonly misunderstood.
The iPhone cannot install Android versions of applications. Instead, supported free apps may be matched with their iOS equivalents so that you can download the appropriate versions from the App Store.
You may still need to sign into each app again.
Paid Android applications are another matter. Buying an Android app through Google Play does not automatically give you ownership of the corresponding iPhone version. If an app uses a separate account system, check the developer’s instructions before assuming your subscription or purchase will transfer.
For apps containing important data, open the iOS version after installation and confirm that your information is present.
Messaging apps deserve particular attention. WhatsApp, for example, has a dedicated migration path during the Android-to-iPhone transfer process, but the procedure and eligibility can depend on the device and software configuration.
Do not delete WhatsApp or wipe the Android phone until you have verified your chats and media on the iPhone.
How to Move Data Manually When the Automatic Transfer Is Not Enough
The automatic migration process is not designed to handle every type of content. Apple provides manual methods for mail, contacts, calendars, photos, music, books, PDFs, and documents.
Google contacts, calendars, and email
If your contacts and calendars are synchronized with your Google Account, you may not need to copy them as ordinary files.
Add your Google Account to the iPhone and enable the services you want to use. This allows the iPhone to access information that is already stored in your account rather than creating another copy manually.
This approach is useful when you already depend on Google services and want to continue using them on iPhone.
Google Photos
If your photos are already backed up to Google Photos, installing Google Photos on the iPhone and signing into the same Google Account can give you access to your existing photo library.
That is different from copying every photo into Apple’s Photos library.
If you specifically want the pictures stored locally in Apple’s Photos app, use the appropriate migration or export process instead. Before deleting anything from Android, verify that the original-quality photos you care about are accessible.
Documents and files
For PDFs, Word documents, spreadsheets, downloads, and other files, cloud storage is often simpler than trying to force everything through the phone-to-phone migration.
Files stored in Google Drive, Microsoft OneDrive, Dropbox, or another supported service can generally be accessed through the corresponding iPhone app after you sign in.
For files stored only on the Android phone, copy them to a computer or cloud service before wiping the device.
Music
Music stored locally as MP3 or other audio files may require a separate transfer method.
Streaming services are simpler because your playlists and library are usually associated with your account. Install the same service on the iPhone and sign in.
For locally owned music, keep the original files somewhere safe and transfer them using a method supported by the software and device you use.
What Does Not Transfer Automatically
No Android-to-iPhone migration method should be treated as a perfect copy of the old phone.
Some content may require manual handling, including:
- Android-only apps
- Certain app-specific databases
- Some paid apps and purchases
- Content stored in unsupported applications
- Some locally stored media
- Passwords that are not part of a supported migration
- Certain device-specific settings
- Files that exceed the iPhone’s available storage
The reason is architectural. Android and iOS use different operating systems, application formats, permission systems, and storage structures.
For example, copying an Android app’s internal folder to an iPhone does not make the app understand that data. The iOS version must support importing or synchronizing that information.
How to Transfer WhatsApp Correctly
WhatsApp is important enough to handle separately during planning.
If WhatsApp offers the migration option during the Android-to-iPhone transfer, follow the instructions presented by the migration process rather than creating multiple independent copies and hoping one will restore correctly.
After the migration, open WhatsApp on the iPhone and verify:
- Your phone number is correct.
- Recent individual conversations are present.
- Important group chats are present.
- Photos and videos inside important chats are accessible.
- Your account settings look correct.
Do not erase the Android phone until these checks are complete.
If WhatsApp does not offer the expected migration option, check the current requirements for your Android version, iPhone model, WhatsApp version, and account configuration. App-specific migration rules can change independently of Apple’s general phone-transfer process.
What to Do If the Transfer Gets Stuck
A transfer that appears frozen does not always mean the phones have failed.
Large photo libraries can take time, especially when the source contains many videos or thousands of individual files.
First, give the process enough time to determine whether the progress indicator is genuinely stuck. Keep both devices powered and connected.
If the transfer repeatedly fails, check these common causes:
- The iPhone does not have enough free storage.
- One phone loses its connection.
- The Android device switches networks during migration.
- The phones are not sufficiently charged.
- A cable is faulty or does not support data transfer.
- The Android phone contains more content than the iPhone can hold.
- The iPhone has already been set up and needs to be erased before using the automated migration method.
Apple specifically advises erasing the iPhone and restarting the transfer if an incomplete migration has left the iPhone appearing full. Make sure the Android content fits within the iPhone’s available storage before trying again.
If you restart the migration, do not immediately start deleting data from the Android phone. The old phone is your fallback copy.
How to Check That Everything Transferred Correctly
Do not judge the migration by whether the iPhone reaches the Home Screen. Perform a proper verification before retiring the Android phone.
Start with your contacts. Open the Contacts or Phone app and check several names, phone numbers, and email addresses. Google also recommends checking contacts and message conversations after the transfer.
Next, inspect Messages. Open several recent conversations, including group chats, and verify that the expected history and attachments are present.
Then check your photo library. Look at recent photos, older photos, videos, screenshots, and any folders that contained particularly important images.
Open your files and cloud-storage apps. Confirm that documents you need for work, school, or personal records are accessible.
Finally, sign into important applications. Check banking apps, password managers, email accounts, social media, messaging apps, authentication tools, and other services that you rely on regularly.
Only after these checks should you consider factory-resetting or selling the Android phone.
Common Mistakes to Avoid
One of the biggest mistakes is setting up the iPhone completely before deciding to migrate. Apple’s automated Move to iOS process is intended for the initial setup stage, so finishing setup first can mean having to erase the iPhone to use it.
Another mistake is relying on a single backup. Cloud synchronization is useful, but it does not guarantee that every local file or app database is available elsewhere.
It is also easy to underestimate storage requirements. A phone with 100 GB of data may contain much more than expected because of downloaded videos, offline music, messaging attachments, and files stored on a microSD card.
Finally, do not wipe the Android device simply because the transfer screen says it has finished. Verification is part of the migration, not an optional final step.
Should You Use a Third-Party Transfer App?
For most users, a third-party migration application should not be the first choice.
The official Apple migration process is designed specifically for moving supported content from Android to iPhone. It avoids giving an unrelated company access to your personal messages, photos, contacts, and files when you do not need that additional software.
Third-party tools can have a place when a particular manufacturer or application requires one, but investigate what the software can access before installing it.
Be especially cautious with programs that request broad permissions, require payment before showing what can actually be transferred, or claim they can copy every aspect of an Android phone into iOS. No utility can remove the fundamental differences between Android and iOS.
A Reliable Android-to-iPhone Transfer Order
If you want the least troublesome migration, use this order:
- Back up important Android data.
- Check the iPhone’s available storage.
- Charge both phones.
- Update Android and relevant apps.
- Decide whether you want a wireless or USB-C transfer.
- Start the iPhone setup.
- Choose From Android when prompted.
- Use Move to iOS, or Transfer without App if your supported devices offer it.
- Select the data categories you need.
- Keep both devices connected until the migration finishes.
- Set up apps and accounts that require separate sign-in.
- Check contacts, messages, photos, videos, files, calendars, and important apps.
- Confirm WhatsApp and other critical app data.
- Keep the Android phone untouched until you are satisfied with the result.
This approach separates the actual migration from the verification stage. That makes it much easier to identify missing information before the old phone is erased.
Conclusion
To transfer data from Android to iPhone correctly, start with the iPhone’s setup process and use Apple’s official migration tools whenever possible. Move to iOS remains the main option for supported Android devices, while newer compatible Android and iPhone combinations may offer Apple’s transfer-without-app process. A USB-C connection can also be useful for a large migration.
The important part is not simply getting the transfer to finish. Check your contacts, messages, photos, videos, documents, accounts, and important apps afterward. Some information will need to be downloaded again, synchronized through a Google or other cloud account, or transferred manually because Android applications and iOS applications do not use the same system.
Keep the Android phone until you have verified everything that matters. That one precaution gives you a fallback if a category did not transfer as expected and makes the move to your new iPhone considerably safer.
If you think there’s been a mistake here, please do let us know by commenting on this post or Contact Us. And a member of our Content Integrity Team will review this decision with you.